|
K6JRF's Page formerly W6FZC Yagi Design Techniques |
|
This section integrates the previous LG203BA extended to 19' boom plus adding a 40M dipole on
to the same boom. The design used both Yagi Optimizer [YO] and Antenna Optimizer [AO] software to set lengths
of each antenna. This started with an email from Steve VK6VZ asking about adding a "moxon" 40M yagi interlaced with my extended boom LG203BA. After finding out what a "moxon" does, it became apparent that it would be difficult if not impossible. But there are some great alternatives and that's what this is about! |
|
Quick Select Menu Select the desired analysis section here. - 3el 20M yagi + 40M -Full Size 40M DP. . . click here - 3el 20M yagi w/ D40 -Modified D40* DP. . . click here - Modified D40 Dipole for Standalone Use* DP. . . click here * D40 is a Cushcraft 40mtr shortened dipole |
|
Simulation vs Real World
This is good time to point out that there may differences from the simulation results vs what you put up in
the real world. Sometimes they are not the same. You should be prepared for this consequence. |
 In general, antennas that have traps, loading coils, capacitors are more difficult to analyze. In AO, these are treated
as "loads". These electrical components change/alter the performance of the antenna and must be modeled properly. However,
constructing an "accurate" model is difficult.
In general, antennas that have traps, loading coils, capacitors are more difficult to analyze. In AO, these are treated
as "loads". These electrical components change/alter the performance of the antenna and must be modeled properly. However,
constructing an "accurate" model is difficult.|
LJ-203BA Extended Yagi with 40M Dipole Before proceeding with the details of this design, please review the LG203BA extended design detailed here. Background The Moxon [L. Moxon - G6XN] yagi peaked my interest and when a AO compatible file was located, the AO analysis showed how well it performs. The Word compatible file is here. Download it to see its amazing performance. Now that this the moxon antenna has peaked my interest, I reviewed my previous work to "refresh" what I used-to-know-but-long-since-forgotten!! Typically, I've had poor results trying to add a lower frequency, say 40mtrs to a 20 mtr yagi. As is well known, the higher frequency antenna normally suffers from this action. I've abandoned this approach a long time ago. But adding a single element, such as a 40M dipole, will work if it's added BEHIND the reflector. AO simulations confirmed that nicely. The bad news is that precious boom length is lost with this approach due to the spacing required. As a result, the 20M performance is reduced proportionally. Of course, the COG is upset and with the large weight load at the end of the boom. This means a truss is mandatory. To try to balance the "load", I found that when the 40M dipole is placed between the 20M driven and director, the 20M yagi becomes useless b/c its feed impedance, F/G and F/B ratio are destroyed and, to boot, it's difficult to match! But I found that you can place the 40M DP between the reflector and driven element and actually gain performance depending on the placement. The closer it is to the driven element the more interaction causing a better F/B ratio than if it was placed closer to the reflector end of the boom. And, since there's no boom lost, the director spacing can be increased to give more F/G. Finally, the 40M dipole is closer to the beam's center of gravity, mounting the antenna will be easier. However, the boom will probably need a "truss" to prevent excessive sag. So that's what inspired this effort. Extended LJ203BA + 40M Dipole Using the Extended LJ203BA (203BAE) as the starting point, a AO run shows the following: Impedance 13.2 - j 20.8 ohms Wire Losses 0.04 dB Efficiency 99.0% At 14.0 deg Elevation: F/G 13.11 dBi F/B 28.04 dB B/W 64 degs Extended LJ203BA + 40M DP - 20 Meter Performance 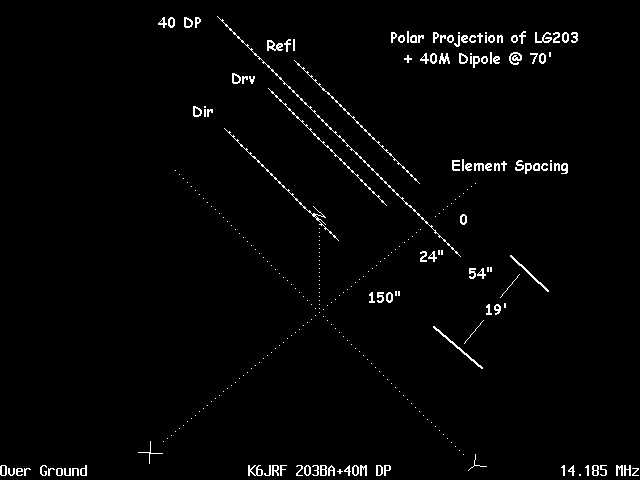 The projection plot shows the elements of each antenna and their placement on the boom. Shown are the 20M yagi and
the interlaced 40M dipole between the REFL and DRIVEN element. This is the "good" news since it now possible to have
an interlaced antenna without significant sacrifice of either antenna's performance. This IS good news!
The projection plot shows the elements of each antenna and their placement on the boom. Shown are the 20M yagi and
the interlaced 40M dipole between the REFL and DRIVEN element. This is the "good" news since it now possible to have
an interlaced antenna without significant sacrifice of either antenna's performance. This IS good news!The element separation is as shown: 20M Refl to 40M DP = 54" 40M DP to Drv ele = 24" Drv ele to Dir = 150" Total boom length = 228" AO analysis done "over ground" at 70ft. |
|
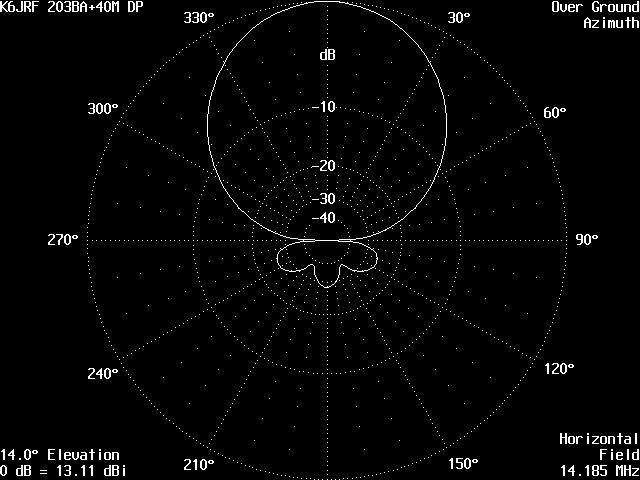 The azimuth plot shows a clean pattern with 64 deg pattern. F/B ratio is exceptional good - apx 28dB.
|
|
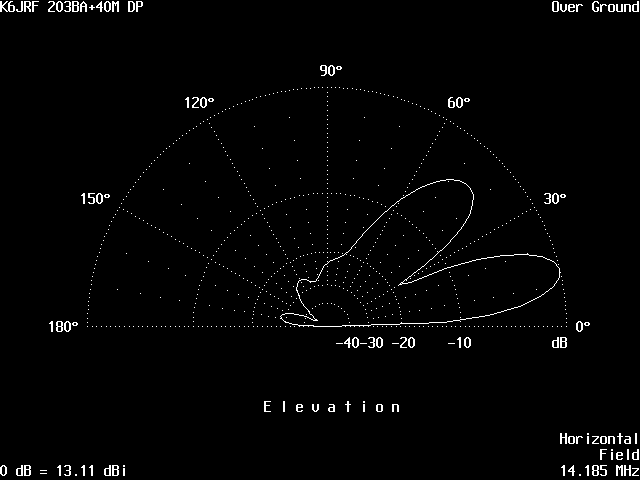 The elevation plot shows a clean forward projection pattern with 14 deg takeoff (DX) and 44 deg high-angle pattern. Again
the F/B ratio is exceptionally good - apx 28dB.
The elevation plot shows a clean forward projection pattern with 14 deg takeoff (DX) and 44 deg high-angle pattern. Again
the F/B ratio is exceptionally good - apx 28dB.
|
|
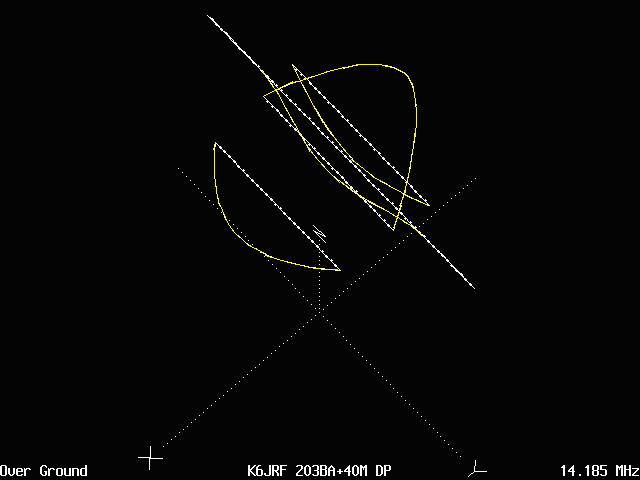 The current vectors (yellow) are shown for 20M operation. Note that the 40M dipole is acting as a secondary reflector as
is the 20M reflector. This is b/c the 40M dipole is very close, 24" away from the driven element. So we have our cake and able to eat
it also!!
The current vectors (yellow) are shown for 20M operation. Note that the 40M dipole is acting as a secondary reflector as
is the 20M reflector. This is b/c the 40M dipole is very close, 24" away from the driven element. So we have our cake and able to eat
it also!!
|
|
Extended LJ203BA + 40M DP - 40 Meter Performance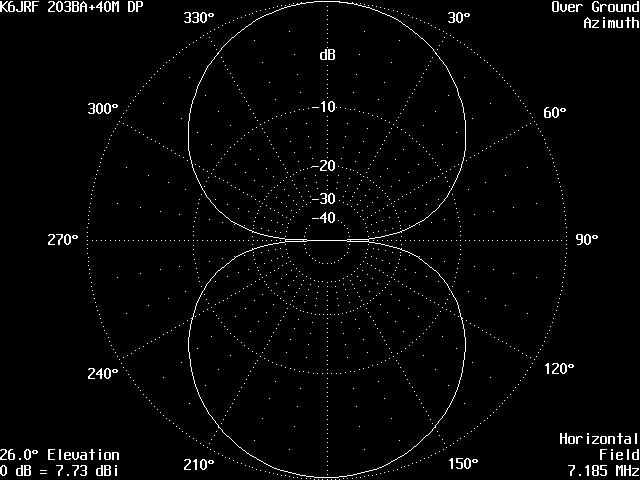 In this series, the 40M dipole is tested @ 7.185Mhz. The interaction, or lack of it, is shown in the plots. The azimuth
shows 7.73dB gain in the familiar symmetrical donut pattern. Note, if you look closely, there is a very slight (0.1db) loss
@ 180 degs.
In this series, the 40M dipole is tested @ 7.185Mhz. The interaction, or lack of it, is shown in the plots. The azimuth
shows 7.73dB gain in the familiar symmetrical donut pattern. Note, if you look closely, there is a very slight (0.1db) loss
@ 180 degs.
|
|
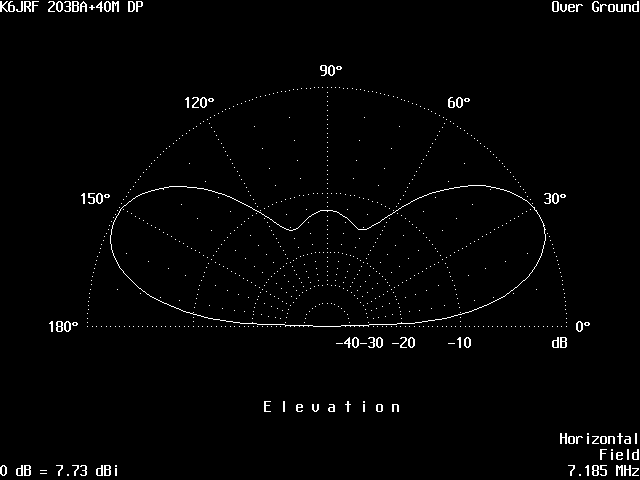 In this elevation plot, the takeoff angle is 28 deg corresponding to 70 ft antenna height. The front and back gain is equal
. . . almost! It's easier to see that there is a slight loss (0.1db) off the backside.
In this elevation plot, the takeoff angle is 28 deg corresponding to 70 ft antenna height. The front and back gain is equal
. . . almost! It's easier to see that there is a slight loss (0.1db) off the backside.
|
|
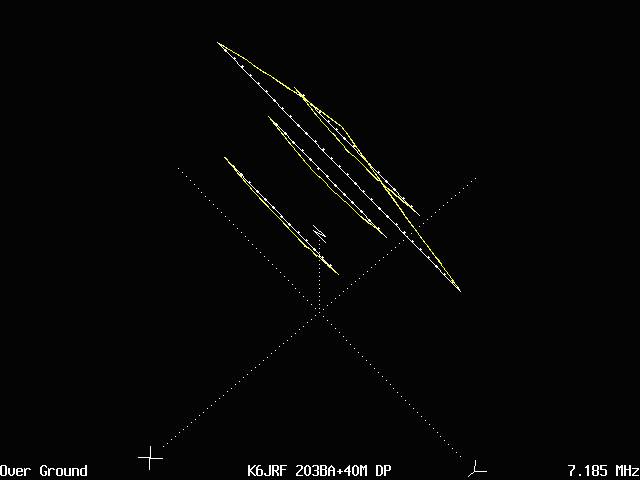 The current vectors (yellow) are shown for 40M operation. Note that all elements of the 20M yagi are acting as a secondary
reflectors for 40M operation. However, the main lobe is from the 40M DP itself.
The current vectors (yellow) are shown for 40M operation. Note that all elements of the 20M yagi are acting as a secondary
reflectors for 40M operation. However, the main lobe is from the 40M DP itself.
|
|
Detailed Schematic 
The the boom-to-mast plate/connector is not in the center of the boom; the director side of the antenna is longer by 41". So to balance the weight, the driven has been moved back toward the reflector and the combined weight of both is balanced by the increased boom length at the director end of the antenna. When I build it, I can see how close it is. May need some 'weight' to balance it but even if that isn't done, there's no large moment on the tower b/c the yagi only weighs 35lbs. The insert box shows how the first section (D1) length of the director is calculated. The length of the director's second element is 69". However, in this design, a new second section reflector element has replaced it to ensure that the element TIP length can be attained. For the increased boom length, an extra section of boom "#4" is inserted to make the 19' 9' overall length of which 19' 6.5" is usable. Tapered HairPin Matching  I recommend using this modified HP matching system since it is easier to match than the original "wide" Beta Match rod
system. This was used to match the 41' boom, 4el YO designed yagi with 9 ohm feed impedance. Was able to set it with
a few inches, so it's worth the time to construct.
I recommend using this modified HP matching system since it is easier to match than the original "wide" Beta Match rod
system. This was used to match the 41' boom, 4el YO designed yagi with 9 ohm feed impedance. Was able to set it with
a few inches, so it's worth the time to construct. The length of the original rods are set to match a higher impedance (apx 15 ohms) and are inconvenient to use. A better way is: Bend the rod at the 5.5" mark apx 40 degs, so the it forms a parallel transmission line w/ 5.25" spacing between the rods. You will need a shorting strap to "tune" the HP to match the driven element impedance (13.1 ohms) which is apx 9" from the beginning of the parallel part of the HP match. The sketch doesn't show a support mechanism but a 2" muffler clamp w/ a aluminum strap can support and space the HP. More pictures will be posted as I construct the yagi showing the details. Strip the coax as shown, to 5.75" in length w/ added spade lugs. Make sure you enter this same length into the YO "Match" section of the program. |
|
Hairpin Taper Match Program Some time ago, I wrote a hairpin matching program that considers the effect of the "tapering" (as shown in the sketch)
so that the inductive taper is not ignored. The program treats this taper and arrives at a more accurate placement
of the "shorting-strap".
Some time ago, I wrote a hairpin matching program that considers the effect of the "tapering" (as shown in the sketch)
so that the inductive taper is not ignored. The program treats this taper and arrives at a more accurate placement
of the "shorting-strap". Recently, I added the effect of 6" lead length from the balun to the driven element attachment point (shown in the previous chart) on the placement point for the shorting strap. For me, the wire leads are 5.75" long using 10 AWG wire. The key parameters for the LJ203BAE + 40M Dipole design are shown in the first chart. The matching frequency, the coaxial line impedance, the HP parallel line width, the starting taper LENGTH point and the taper WIDTH are all entered producing the output screen shown in the second chart. |
|
 The shorting strap should be placed apx 9" from the starting point of the parallel HP transmission line. This
includes the effect of 5.75" coax leads. This placement should be "close" and make a good starting point if not the
'perfect' matching point.
The shorting strap should be placed apx 9" from the starting point of the parallel HP transmission line. This
includes the effect of 5.75" coax leads. This placement should be "close" and make a good starting point if not the
'perfect' matching point.The program is available [HP_V4.83] . . click here to d/l it. This DOS program runs on all computer systems from Win98 thru Win 7 and 8.1. Simply follow the prompts and the output screen shows 'where' to place the short. |
|
|
AO Text File For those who have AO, this listing shows the format of a AO file. Copy and paste into a "text-file" editor such as Notepad and save it as "JRF20344.ANT" [that's my name for the file but it can be anything convenient]. K6JRF 203BA+40M DP Over Ground @ 70' 14.185 MHz 4 6061-T6 wires, inches rfs = 114 ; 20M refl @ end of boom = 19' rf40s = 60 ; 40M DP = 54" in front of 20M refl des = 24 ; des org = 24" behind "0" ref [xyz] point drs = 114 ; drs org = 114"; boom = 19' de40l = 401 ; de40l org = 401.0 rfl = 206.375 ; rfl org = 206.375 del = 195.5 ; del org = 195.5 drl = 187.5 ; drl org = 187.5 hg = 840.00 ; hg org = 840" 1 -rf40s -de40l hg -rf40s de40l hg 1.0023 1 -rfs -rfl hg -rfs rfl hg 0.8600 1 -des -del hg -des del hg 1.0023 1 drs -drl hg drs drl hg 0.8525 1 source Wire 3, center ; Wire 3 for 20M; Wire 1 for 40M Check back here for more info . . . . my plan is to complete the construction of the LG203BAE with the 40M dipole. At present I have a Cushcraft D40 dipole. The specs are: 2KW power; 42ft tip-to-tip; 1.3sq ft wind load; 12lbs weight. The present analysis represents a "generic" FULL SIZE 40M dipole. For the D40, the loading coil will be measured and a new analysis will be needed since it's length will affect the 20M yagi operation. However, only some slight adjustments will be needed IMO. To this end, the following section was undertaken to test the theory. |
|
|
LJ203BAE w/ 40M DP as Common Feed [CF] Background The proceeding analysis shows the performance of the four (4) element yagi using a full size 40M DP as the added "parasitic" element located close behind the driven element. However, it should be possible to use a Cushcraft D40 40M DP as the common feed for both 20M and 40M operation, however, it needs extensive modification!. About 40 years ago (!), I found that my Create Design [CD78] 80mtr dipole also resonated on 20mtrs due to the loading coil placement. So the same principle should make it work for the Cushcraft D40 dipole. After modeling the STOCK Cushcraft D40 dipole, some modifications are needed to be able to resonant on 20M and 40M. Here's the analysis. Cushcraft D40 Dipole Analysis: Stock  The "generic" fullsize 40M DP that was used in the 1st analysis is more efficient than a 'shortened' dipole but the
Cushcraft D40 dipole may be able to be an acceptable driven element for both 20M and 40M.
The "generic" fullsize 40M DP that was used in the 1st analysis is more efficient than a 'shortened' dipole but the
Cushcraft D40 dipole may be able to be an acceptable driven element for both 20M and 40M.The data from the installation manual was entered including each section length, their taper measurements and the capacitive hat dimensions. The loading coils were measured (12.8uH @ 0.1 ohms) and, after simulation, the 20M and 40M performance was checked and analyzed using AO. For 40M, the total length is the most important and the capacitive hat loads the antenna sufficiently so that it does resonant on 40M nicely. However, the performance on 20M is unacceptable and, without modifications, would not be usable as a 20M driven element. [Of course, if you have a "super" tuner, it MAY be able to match the highly reactive load impedance and use the D40 in the "stock" condition.] The reactance -j 335 ohms means that the distance between the two loading coils is too short (27ft) and needs to be extended if it is to be used. The loading coils measure 12.8uH @ 0.1 ohm series resistance. And, as stated in the note (Simulation vs Real World), the "real" problem is the 7" gap in 0.8750" section where the LCA exists. 
|
|
|
Extended LJ203BA w/ Modified D40 DP as CF After making the analysis-file modifications, the AO run shows the following:  The re-designed D40 DP now resonants on 20M and 40M as it needs to be. With the close-to-zero reactance on both bands, the feed impedance is 24ohms @ 20M and 47 ohms @ 40M. Everything looks good! Unfortunately, the element length of two (2) sections has to increase in order to increase the separation of the two (2) loading coils to apx 37 ft. The details are contained in the "AO Text" file below. Efficiency of close to 100% on 20M and 40M bands has been achieved. |
|
LJ203BAE w/ 40M DP as CF - 20 Meter Performance The projection plot shows the elements of the yagi and their placement on the boom. As contrast, the separate 20M driven element has been replaced with the 40M DP used as Common Feed [CF]. This is the "good" news since it now possible to have only one common feed-element without significant sacrifice of the antenna's performance on 20M or 40M after the D40 DP has been modified. Note that the two (2) "loads" are hi-Q coils, 12.8uH w/ 0.1 ohms and the two (2) capacitance hats, 17.25" rods with 0.185" dia, now condition the 40M DP to resonant on 20M (between the coils) and overall length for 40M operation. The element separation is as shown: 20M Refl = 0" 20M Refl to 20M/40M feed = 114" 20M/40M ele to Dir = 114" Total boom length = 19' Total D40 DP length = 46' AO analysis done "over ground" at 70ft. |
|
 The azimuth plot shows a clean pattern with 64 deg pattern. F/B ratio is quite good - apx 25dB worst lobe.
|
|
 The elevation plot shows a clean forward projection pattern with 14 deg takeoff (DX) and 44 deg high-angle pattern. Again
the F/B ratio is very good - apx 25dB.
The elevation plot shows a clean forward projection pattern with 14 deg takeoff (DX) and 44 deg high-angle pattern. Again
the F/B ratio is very good - apx 25dB.
|
|
 The current vector (yellow) are shown for 20M operation. Note that the 20M/40M DP's loads act to isolate the end producing
20M resonance just as if it was "cut" for 20M. Here, even with the modification to produce optimum separation, the 20M
resonance is almost perfect. So we have our cake and able to eat it too!
The current vector (yellow) are shown for 20M operation. Note that the 20M/40M DP's loads act to isolate the end producing
20M resonance just as if it was "cut" for 20M. Here, even with the modification to produce optimum separation, the 20M
resonance is almost perfect. So we have our cake and able to eat it too! | |
Extended LJ203BAE w/ 40M DP as CF - 40 Meter Performance In this series, the 40M dipole is tested @ 7.185Mhz. Unlike the previous analysis, there is no interaction since the
typical "donut" pattern is produced. The azimuth shows 7.51dB gain. The re-designed D40 accounts for this slight increase
in F/G.
In this series, the 40M dipole is tested @ 7.185Mhz. Unlike the previous analysis, there is no interaction since the
typical "donut" pattern is produced. The azimuth shows 7.51dB gain. The re-designed D40 accounts for this slight increase
in F/G.
|
|
 In this elevation plot, the take-off angle is 28 deg corresponding to 70 ft antenna height. The front and back gain are
equal in magnitude. There is no loss to element interaction.
In this elevation plot, the take-off angle is 28 deg corresponding to 70 ft antenna height. The front and back gain are
equal in magnitude. There is no loss to element interaction.
|
|
 The current vectors (yellow) are shown for 40M operation. Note that all elements of the 20M yagi are acting as a secondary
reflectors for 40M operation. Since they are 'short', their contribution is small to the overall pattern. So the main lobe
is primarily from the 40M DP itself.
The current vectors (yellow) are shown for 40M operation. Note that all elements of the 20M yagi are acting as a secondary
reflectors for 40M operation. Since they are 'short', their contribution is small to the overall pattern. So the main lobe
is primarily from the 40M DP itself.
|
|
|
AO Text File For those who have AO, this listing shows the format of a AO file. Copy and paste into a "text-file" editor such as Notepad and save it as "JRF20352.ANT" [that's my name for the file but it can be anything convenient]. 
|
|
Detailed Schematic
For the Cushcraft D40 DP, there are two (2) REPLACEMENT sections needed b/c of the new length of the dipole. The Cushcraft D40 manual in PDF details the how-to-build-it. Located here. Download it and follow the construction details substituting the new sections as needed. As of today, 8/27/17, two (2) are needed. Please note that if you intend to use the D40 DP on 40M ONLY, there's no need to make any changes to the stock D40. It is fine as is! D40 Loading Coil 
I measured it with my Fluke and Autex Research RF Analyst. Both measured EXACTLY 12.8uH . . . which was amazing! The K6STI coil program makes three!  |
|
|
Modified D40 as Stand-Alone [SA] 20M/40M operation. Background How would the modified D40 dipole work in a stand-alone [SA] operation on 20M and 40M?  It will operate very nicely per AO analysis. Here's the summary chart for 20M and 40M. Note the feed impedance is 65 ohms @ 20M and 50 ohms @ 40M. Very nice! |
|
Modified D40 -SA on 20M The projection plot shows the D40 dipole in SA operation with the vector current (yellow) shown. Note that the two (2) "loads" are hi-Q coils, 12.8uH w/ 0.1 ohms and the two (2) capacitance hats, 17.25" rods with 0.185" dia, now condition the 40M DP to resonant on 20M (between the coils) and overall length for 40M operation. |
|
 The azimuth plot shows a the two lobe cloverleaf pattern.
|
|
 The elevation plot shows a clean forward projection pattern with 14 deg takeoff (DX) and 44 deg high-angle pattern.
|
|
Modified D40 SA operation - 40M  In this series, the 40M dipole is tested @ 7.185Mhz. Unlike the previous analysis, there is no interaction since the
typical "donut" pattern is produced. The azimuth shows 7.51dB gain. The re-designed D40 accounts for this slight increase
in F/G.
In this series, the 40M dipole is tested @ 7.185Mhz. Unlike the previous analysis, there is no interaction since the
typical "donut" pattern is produced. The azimuth shows 7.51dB gain. The re-designed D40 accounts for this slight increase
in F/G.
|
|
 In this elevation plot, the take-off angle is 28 deg corresponding to 70 ft antenna height. The front and back gain are
equal in magnitude. There is no loss to element interaction.
In this elevation plot, the take-off angle is 28 deg corresponding to 70 ft antenna height. The front and back gain are
equal in magnitude. There is no loss to element interaction.
|
|
 The current vectors (yellow) are shown for 40M operation. The main lobe is from the 40M DP resonance itself.
|
|
|
AO Text File For those who have AO, this listing shows the format of a AO file. Copy and paste into a "text-file" editor such as Notepad and save it as "JRFD42.ANT" [that's my name for the file but it can be anything convenient]. 

|
|
|
Summary: The F/G, F/B are almost equal to the four (4) element version but the advantage in the significant less wind-load, total weight, single feed line and maybe the most important, center-of-gravity balance make this an attractive alternate. The Cushcraft D40 dipole can be used as the common feed element for both 20M and 40M after modification - or it can be used as a standalone 20M and 40M dipole. The modification to the D40 is not that bad . . two (2) new sections of 1.00" dia @ 12ft . . and is not difficult to do. The other sections are reduced so those can be used as-is. After all is considered, the approach will make a 'balanced' load (D40 DP at the center) and requires only one (1) feed line for both 20M and 40M operation. The weight and wind-load considerations also make it a good choice. |
|
Send me |