|
K6JRF's Page formerly W6FZC Yagi Design Techniques |
|
This new section shows the actual design of a monoband yagi employing Yagi Optimizer [YO],
and Antenna Optimizer [AO] software to detail the steps required to initiate, analyze and complete the real-world design of
any antenna. |
|
During the early 1990s thru 1998, an excellent antenna analysis software was bought to market. Written by Brian Beezley,
the sw packages were called Yagi Optimizer [YO], Antenna Optimizer [AO] and Terrain Analyser [TA]. Using the three programs,
any antenna (wire, verticals, yagis, quads, etc) can be completely characterized in a few minutes over most any terrain.
This fine antenna software is no longer offered and there's is no way to purchase it . . . unfortunately. About 14 years ago, I used this sw to design a 4el 20mtr monoband yagi on a 41' boom. The starting point was a Japanese antenna (CL20, 31' boom). The final results are shown here. As you see, the f/g was 10.3dBi with 28dB f/b ratio. The 'bad' part was the low feed impedance [9 ohms] but . . . that's exactly the way I designed it!. Was only was interested in covering the low phone portion of the 20mtr band and it did that in style. The sw is an excellent design tool provided some simple rules are followed. |
|
Designing Yagis I just love building yagis right from the first time I constructed a 5el, 20mtr monoband yagi on a 53' boom! The picture shows it in 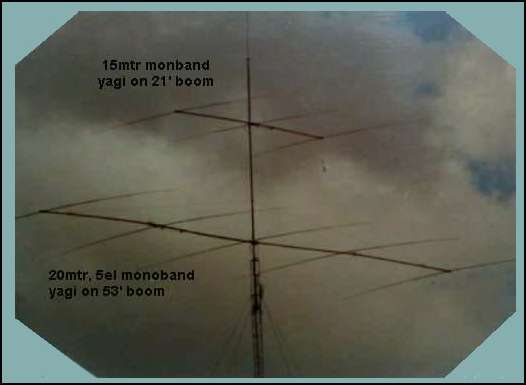 contrast to another home brew 3el, 15mtr monoband yagi on 21' boom. It certainly looks small! The 'bad' part was the fact that this was
built using the 'handbook' dimensions. It worked but it didn't work as it should have. It took apx another 1 year to 'tune' the antenna
to get some 'real' f/g from it. That was in the days before antenna design SW. Why didn't it work? Simply b/c the element's taper
schedule was not properly taken into account so all of the elements were basically too short! This always occurs
when you use raw handbook dimensions and do not adjust the element lengths due to tapering.
 This section details the design a small boom monoband yagi showing how to complete it properly so that it works the way it says it does! Over the years, I've had a number of HG204BA yagis which were used as a starting point. Many Hams have used this yagi as the starting point to make a longer boom yagi or to custom tune it for a desired operating portion of the band. This time, I started w/ a LJ203BA (Hygain HG203BA is equivalent) and found that if a few feet of boom is added, a very excellent yagi results. The standard 203BA's boom is 16' 4" but adding another section of boom (41") makes it take on new stature. Stock LJ203BA Simulation Results The YO chart shows the forward/gain (f/g), front/back ratio (f/b) and impedance (Z). 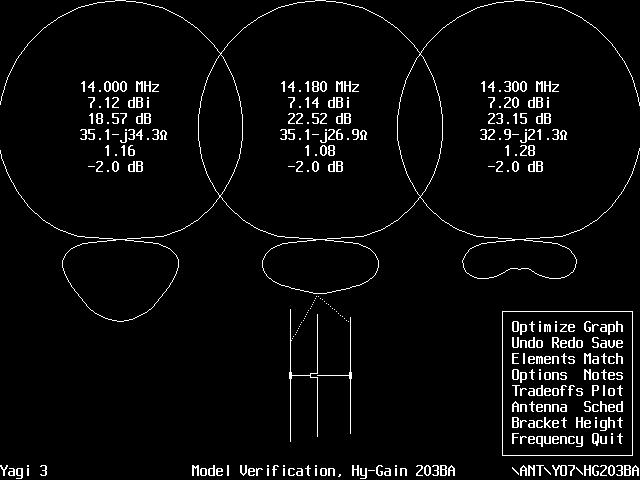 The data was entered from the assembly manual and YO was set to "W6QHS" taper algorthmn. The specs:
Electrical: F/G = 7.15 dBi F/B Ratio = 23dB Max VSWR @ Res < 1.5:1 Mechanical: Boom = 16' 6" Boom Dia = 2" Lng El = 37' 1" W/Surv = 80mph Net Wgt = 32 lbs W/Surf= 5.3 sg ft W/Load = 138 lbs As you see from the chart, the mid-band gain shows as 7.14dBi which agrees well w/ the specs. F/B ratio shows as 22.52dB @ 14.180Mhz. Overall, the results show well for YO's simulation capability. The feed impedance shows as 35.1 ohms w/ the imaginary part at -26.9 ohms.
The reason is simple: The dimensions stated are set for use with their Beta Match so when it's included, it should show close to acceptable SWR (1.2:1) or less. This simulation looks ok for a Beta Match. The driven element must be shortened by apx 0.25" to effect @ 14.180Mhz match (1.02:1) using the supplied "Beta-Rods". The Dimensions are 11" wide by 23.5" long. In the "extended" design below, a more narrow HP spacing (3.5") will be used b/c experience has shown that matching w/ a wide-spaced rods as supplied is problematic when the Z is lower. See the "Tapered HairPin Matching" Section at the end of this page for more details. LJ-203BA Extended Yagi The days of the 'big' yagi are over for me! Even if the old 5el, 53' boom was still 'alive', I wouldn't use it. What I want now is a compact antenna that's light weight, has a small wind load and will last for a long time at the 90' level on my tower. After checking some yagi designs w/ YO, the LJ-203BA (HG203BA is equ) with ant extended boom was my candidate. Nice clean pattern and easy to build. Light weight (34lbs) and small wind load (5.4 sq ft). Originally thought that the boom would be over 21' with the extra seciton but the usable dimensions came out to 19' 9" boom. So that's what it'll be. Originally, I wanted large f/g, 8.35dBi but also wanted to keep the feed impedance as high as possible consistant with that f/g. Later my goals changed to keep the feed Z as high as possilbe consistant with f/g > 8.0dBi. The higher f/g is possible but at large BW sacrifice. The design goals are summarized below: Electrical: F/G > 8.0 dBi; Z > 18.0 ohms; F/B Ratio > 28dB; VSWR @ Res < 1.02:1; VSWR @ band edges < 1.20:1 Mechanical: Boom = 19' 9"; Boom Dia = 2"; Lng El = 36'; Wind Surv = 80mph; Net Wgt = 35lbs; Wind Surf= 5.5sg ft; Wind Load = 140 lbs Summary Screen 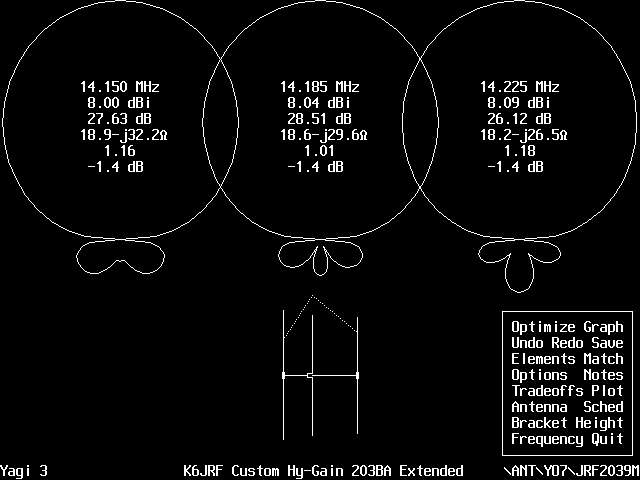 YO features a multi-level operating menu where the function in question is highlighted in an highly visible color. The black and white
presentation shown here unfortunately. Other key charts can be displayed when called on.
 The main operating screen shows the results of parameters manipulated so that you can instantly see the results of a modification of some parameter. This screen shows a quick summary of the yagi's parameters such as f/g, f/b ratio, feed impedance, max gain that this yagi can have are some examples. This screen also shows the operating BW summarized by three (3) frequencies (low, mid and high) w/ a representation of the E-field pattern at the three frequencies. At 14.185Mhz, the center frequency, it shows that yagi has 8.04dBi f/g, 28.5db f/b and feed impedance of 18.6 ohms. The SWR is 1.01 at the center frequency, rising to less than 1.2:1 at the frequency extremes. |
||||||||||||||||||||||||||||
PLOT Screen Chart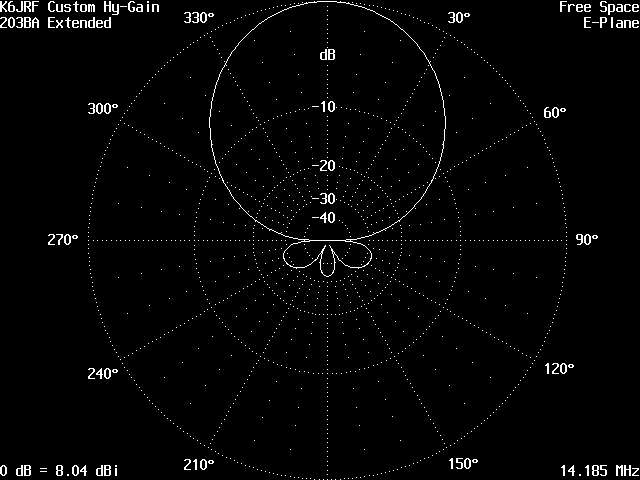 Another important output screen is the "PLOT" chart. Pressing the "p" key generates the E-field and H-field plots in 'free-space'. The
E-field plot shown here is well 'behaved', ie, the back lobes are small and almost of the same amplitude all away around the yagi's back-side.
This chart shows the yagi's gain envelope as if you were looking down on it from the top. The plot is made in 'free-space' w/ the f/g expressed in "dbi" units; gain in dB over an iisotropic source. You have freedom to change the displayed numbers in the "OPTIONS" menu. The beamwidth of this yagi is 60degs. This is measured from the -3db power points and can be easily read from the chart. Forward gain (f/g) equals 8.04dBi with front/back (f/b) ratio of 28.5dB at the frequency of 14.185Mhz. |
||||||||||||||||||||||||||||
NOTES Screen Chart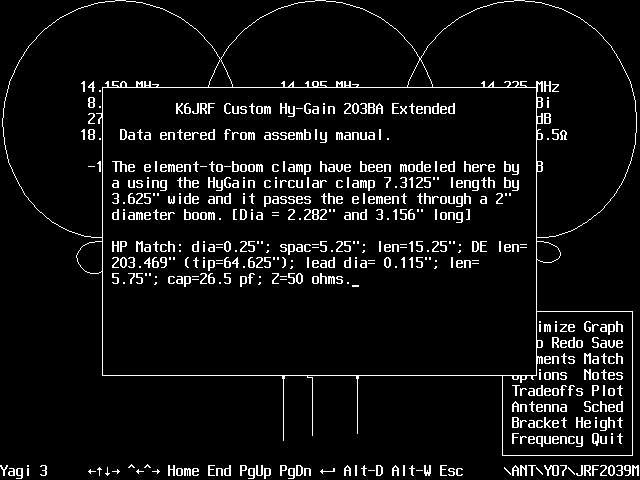 YO provides a place in the design file where important data can be recorded. I've traditionally used this space to add the design goals for
this yagi along w/ important construction facts such as the construction of the Hairpin Matching section.
 In this design, the basic method of increasing the forward gain is done by adding another 4' boom (actually turns out to be only 41" long b/c of the swage) section and replacing the D2 section on the D1 director. This makes the boom 19' 9" long. Later the "schematic" will show the details of "how-to-build" this antenna. The Hairpin matching section key dimensions are included so you know where to set the sliding short. Also the boom to element "bracket" is modeled since it is very large effect b/c each element mounts inside of this bracket. Thus the inductance presented by each element is different than the actual length of the element itself. |
||||||||||||||||||||||||||||
ELEMENTS Screen Chart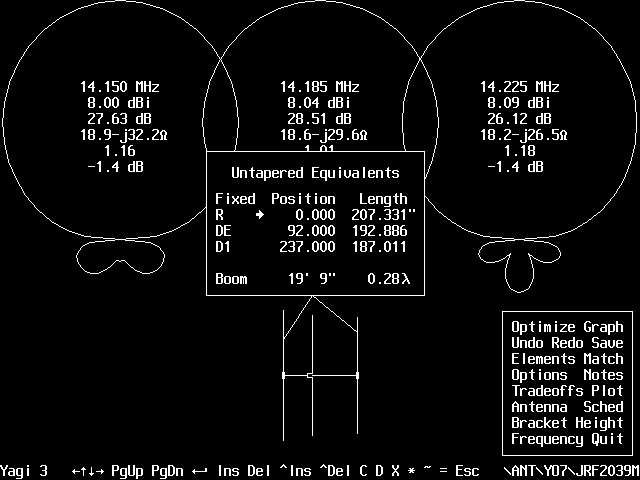 This screen shows the untapered equivalent dimensions after YO translates the tape schedule into the program. The element spacings are
shown as well as the aforementioned equivalent electrical lengths of each element.
This screen shows the untapered equivalent dimensions after YO translates the tape schedule into the program. The element spacings are
shown as well as the aforementioned equivalent electrical lengths of each element.With this screen, you can manually move elements or make length adjustments. Any changes made here will change the f/g, f/b, Z as well as the taper schedule. Small changes are ok. The useable length of the boom length is 19'-9" and the length of the yagi in "lambda", wavelengths. This is 0.28 Lambda antenna. |
||||||||||||||||||||||||||||
MATCH Screen Chart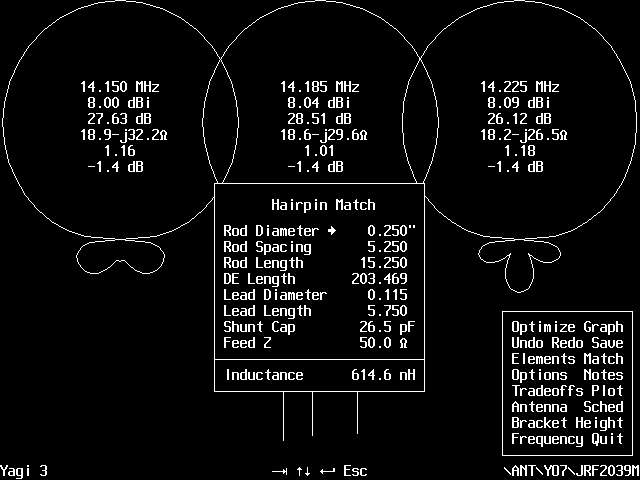 If your starting design using a Hy-Gain product, you normally would use a "hairpin" matching section. Hy-gain called it a "beta-match" but
it's nothing more than a hairpin w/ a different name! I prefer the insulated driven element b/c the final pattern is much cleaner
and more symmetrical than a "gamma-match" fed yagi.
If your starting design using a Hy-Gain product, you normally would use a "hairpin" matching section. Hy-gain called it a "beta-match" but
it's nothing more than a hairpin w/ a different name! I prefer the insulated driven element b/c the final pattern is much cleaner
and more symmetrical than a "gamma-match" fed yagi.The MATCH chart is accessed by pressing "M" on the keyboard. When displayed, the inset chart shows the individual parameters required to ensure low SWR at the yagi's center frequency (14.185Mhz). The driven element is reduced in length to make appear as a capacitive element such that the inductive "beta-rod" can cancel this to produce a 50 ohm feed impedance. The key parameters of this match are the "length", 15.25" as well as "spacing", 5.25". The driven element length is manipulated such that the SWR is reduced to unity or close to it (1.01:1) when the proper driven element length is attained simultaneously with the hairpin rod length and spacing. The leads [#10AWG = 0.115" dia] from the balun [Balun Designs] s/b 5.75" in length as shown and the capacitance loading of the driven element boom-to-element bracket is 26.5pf shunt capacitance per YO documentation. Please note that YO's hairpin match calcs assume a 'constant' length of spacing (5.25") from the driven element to the shorting point. So this dimension will always be longer than my linear taper section. It makes the transistion from the driven element (11.25") attachment point to the parallel section of HP line (5.25"). The YO hairpin match dimensions are included for completeness. For the "real" hairpin dimensions, please see the "Tapered Hairpin Matching" section below. BRACKET Screen Chart 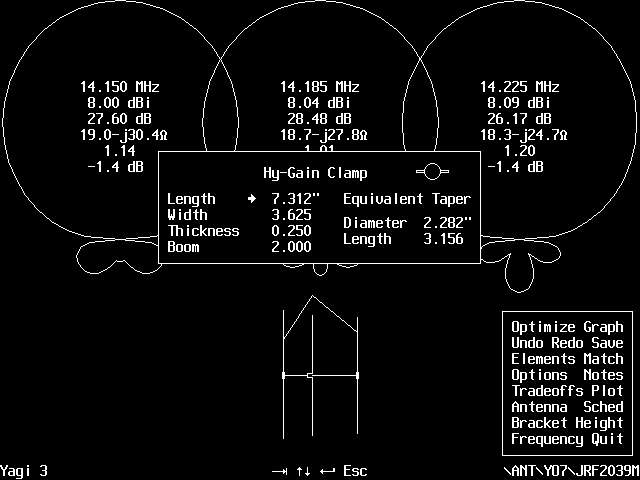 This screen is accessed by pressing "b" on the keyboard, then "tab" to Hygain clamp This screen lets YO model the HG bracket to ensure
that physical dimensions are properly translated into YO's electrical models at the frequency of interest to ensure proper element lengths
are attained.
 The actual Hygain (MFJ) bracket dimensions are: 7.3125" length and 3.625" width as measured at the center where the elements pass "through". This is where the measurements s/b made. After entering these dimensions into YO, the equivalent element-to-boom bracket is modeled to produce the dimensions shown in the previous (TAPER) screen for the first section, 2.282" dia + 3.156" length, except for the DE bracket. More in the next section. |
||||||||||||||||||||||||||||
TAPER Screen Chart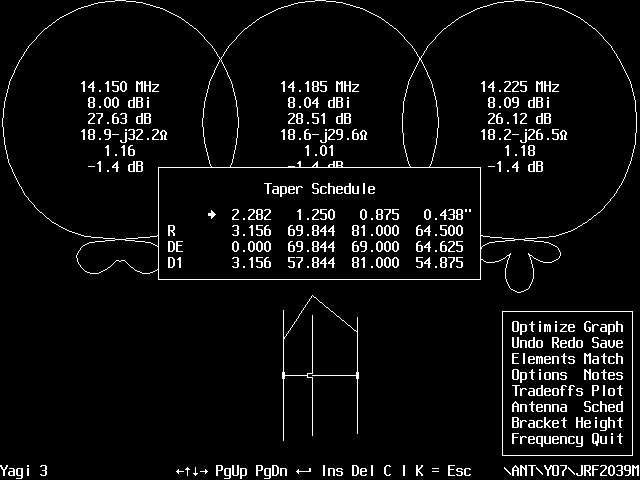 The dimensions for the TIPS of each element are shown in this chart. Access this screen by pressing "s" on the keyboard. The dimensions are
shown for each yagi element but it's the tip section of each that is important. These are lengths that each tip [three (3) for the
LJ203BA] should be adjusted. For example, the director's tip length s/b adjusted to 54.875", apx 54-7/8".
 The first section, nearest the boom, is a "modeled" parameter of the element-to-boom clamps. The HG antennas use a bracket that's 7.3125" long by 3.625" wide for all elements EXCEPT THE DE. It's thickness is 0.250" for both bracket halves . [The DE bracket is bigger but not modeled!] Inputting this data into YO, gives the "simulated" value of 3.156" wide with 2.282" diameter. Each element is held by this clamp so that each elements length is reduced by the amount of clamp depth. For example, the director's first element length is 60" but is treated as if it were 61" long. YO recommends that you add 1/2 of the boom dimension to the element length closest to the boom except for the Driven element!. Now that actual amount that is 'shown' is 57.844". This dimension is arrived by this calculation: 61" - 3.156" bracket = 57.844". This number is entered as the first section's length. You should NOT forget to do this since the element lengths will be incorrect if it's not. Note that all of the other elements are done the same. An exception is the DE's element/boom bracket. Since it's insulated, there no interaction with the bracket as there is for the other elements. The dimension for this bracket is set to "0.000"! The length of the DE first section is set to the 69.844" in this case. The actual length of this section is 72" but I find that the YO is more accurate if the former dimension is used. For a "hairpin" match, the beta-rod intersects the DE and negates the effect of this bracket. The bracket is essentially removed as far as the electrical calculations are concerned.
Detailed Schematic 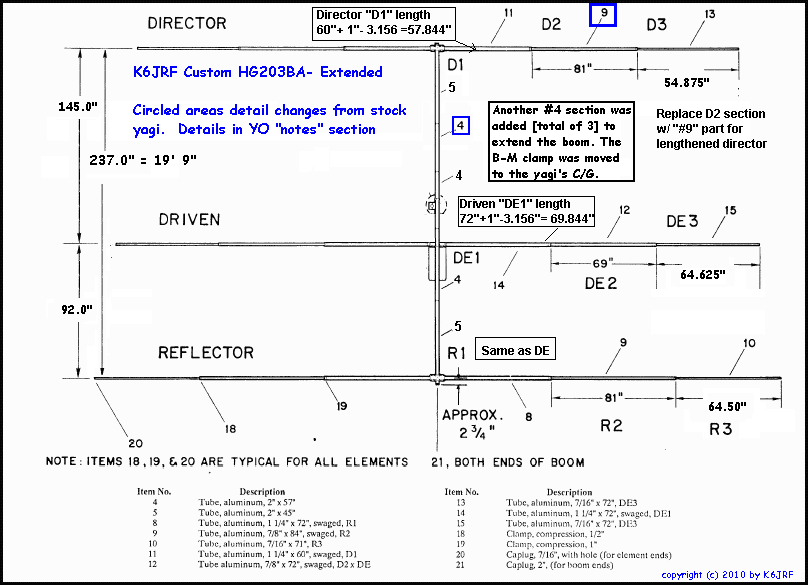
The the boom-to-mast plate/connector is not in the center of the boom; the director side of the antenna is longer by 41". So to balance the weight, the driven has been moved back toward the reflector and the combined weight of both is balanced by the increased boom length at the director end of the antenna. When I build it, I can see how close it is. May need some 'weight' to balance it but even if that isn't done, there's no large moment on the tower b/c the yagi only weighs 35lbs. The insert box shows how the first section (D1) length of the director is calculated. The length of the director's second element is 69". However, in this design, a new second section reflector element has replaced it to ensure that the element TIP length can be attained. For the increased boom length, an extra section of boom "#4" is inserted to make the 19' 9' overall length of which 19' 6.5" is usable. Tapered HairPin Matching 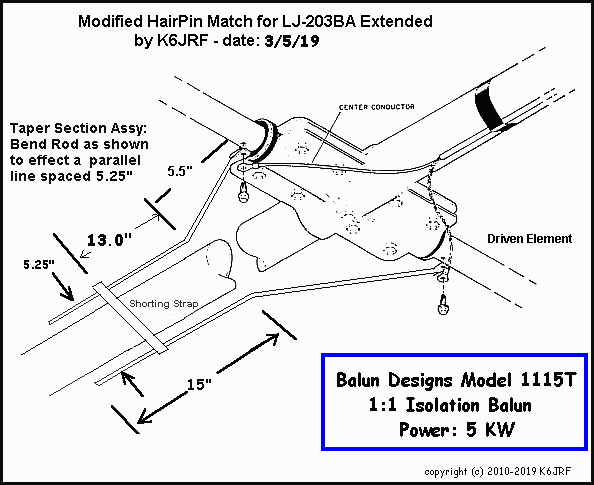 I recommend using this modified HP matching system since it is easier to match than the original "wide" Beta Match rod
system. This was used to match the 41' boom, 4el YO designed yagi with 9 ohm feed impedance. Was able to set it with
a few inches, so it's worth the time to construct.
 The length of the original rods are set to match a higher impedance (apx 25 ohms) and are inconvenient to use. A better way is: Bend the rod at the 5.5" mark apx 40 degs, so the it forms a parallel transmission line w/ 5.25" spacing between the rods. You will need a shorting strap to "tune" the HP to match the driven element impedance (18.6 ohms) which is apx 13" from the beginning of the parallel part of the HP match. The sketch doesn't show a support mechanism but a 2" muffler clamp w/ a aluminum strap can support and space the HP. More pictures will be posted as I construct the yagi showing the details. |
||||||||||||||||||||||||||||
Hairpin Taper Match Program Some time ago, I wrote a hairpin matching program that considers the effect of the "tapering" (as shown in the sketch)
so that the inductive taper is not ignored. The program treats this taper and arrives at a more accurate placement
of the "shorting-strap".
 The key parameters for the LJ203BAE design are shown in the first chart. The matching frequency, the coaxial line impedance, the HP parallel line width, the starting taper LENGTH point and the taper WIDTH are all entered producing the output screen shown in the second chart. The shorting strap should be placed apx 13" from the starting point of the parallel HP transmission line. This placement should be "close" and make a good starting point if not the 'perfect' matching point. The program is available [HP_V4.86] . . click here to d/l it. This DOS program runs on all computer systems from Win98 thru Win 7 and 8.1. Simply follow the prompts and the output screen shows 'where' to place the short. YO Text File For those who have YO, this listing shows the format of a YO file. Copy and paste into a "text-file" editor such as Notepad and save it as "JRF2039M.YAG" file. K6JRF Custom Hy-Gain 203BA Extended 14.150 14.185 14.225 MHz 3 elements, inches 2.2817 1.2500 0.8750 0.4380 00.000 3.1562 69.8437 81.0000 64.5000 92.000 0.0000 72.0000 69.0000 64.6250 237.00 3.1562 57.8437 81.0000 54.8750 This is custom tuned LJ203BA w/ added boom (4.0') and replacement sections for the Director. Initial data entered from assembly manual and tuned w/ YO; checked w/ NEC. The element-to-boom clamp have been modeled here by a using the HyGain circular clamp 7.3125" length by 3.625" wide and it passes the element through a 2" diameter boom. [Dia = 2.282" and 3.156" long] HP Match: dia=0.25"; spac=5.25"; len=15.25"; DE len= 203.469" (tip=64.625"); lead dia= 0.115"; len= 5.75"; cap=26.5 pf; Z=50 ohms. Comments This design gave you the needed details for building a real-world yagi from a "paper" design. I've shown the major items that you need to take into account in order to successfully complete a working yagi. So don't be afraid to dig-in and give it try. Now that it's designed, you need to build it . . . so read on.  The required parts are here and the construction has been started. The pictures show the "build" phase and these will serve to
document the build effort. Also I'll report how well design works and what modifications may be needed to attain the design goals.
Today was spent assembling the boom and driven element section to determine the "actual" length of the boom and to complete the assembly of the hairpin match section to see what problems would be encountered. Glad to report that there weren't any surprises! The pic shows the overall assembly showing placements of the DE, REF and Dir elements. As the pic shows, I picked up an extra 1.5" so it was added to the DIR dimension. The overall length of the boom, tip-to-tip is 20' 6-5/8" (242.625") total. When the plastic "end-caps" (1.0" x 2) are added and the bracket half-dimension (1.7" x 2) is figured, the remaining length of 237.0" is available for the elements. Construction Changes - Yagi Center of Gravity  This section shows the 'changes' that were made (from the original plan) to make the yagi realizable! The biggest problem was the
offcenter load so this required some major changes.
This section shows the 'changes' that were made (from the original plan) to make the yagi realizable! The biggest problem was the
offcenter load so this required some major changes.The sketch shows the details of how to make the three (3) sections work with each end being swaged to 1-7/8" dia. It should be obvious that a #4 section's swaged end will mate with a #5 section as it should. However, it will not with another #4 section's non-swaged end. So the only way to use these three (3) sections is to join them w/ boom sleeves. Of course, I could have used other tubing if I had some. Since it didn't, I had to make this work. Moving all three #4 sections to the center (most of the weight) and finding the c/g of the yagi is accomplished by the method shown in the sketch. The swaged end of the "center" section must be brought to 2.0" OD to ensure that the section won't 'droop' when it's loaded with the other sections (#5) and the yagi elements. I recommend that the 1/4" dia holes be enlarged for the use of 5/16" hex bolts. Be careful to drill the new holes with "precision" so that there's no excessive play when the sections are mated.  The picture shows the re-positioned boom-to-mast clamp at the yagi's C/G.
I thought that the imbalance would be 'tolerable' and could be ignored! No such luck! Another piece of boom sleeving as shown above was used to connect the other two (2) sections of #4 tubing which then allowed me to move boom-to-mast clamp to the yagi's center of gravity. This point is apx 121" from the director end. The end result is a balanced load which is much easier to handle and add to the tower. The inset picture shows how one of the two (2) boom sleeves was accomplished. Two #4 sections are butted together; with a 12" section of 6061-T6 tubing w/ 0.25" wall! The extra strength of this piece makes the overall structure as stable as if it were one solid piece. The 'gray' stuff is Penetrox before smoothing it out . . . if you don't use it, you'll NEVER get it apart in a few years! HP Assembly  The HP was assembled using the supplied LJ203BA HP rods bent/cut to fit the desired matching dimensions chosen.
 After changing the design goal to get a higher feed impedance (18 ohms), I found an error in the Taper Match Program that made the HP match point shorter than it should be. After fixing that and raising the feed impedance (18.6 ohms), I found that the HP rods were too short (13" length). So the HP width had to be increased from 3.5" to 5.25". This was easily accomplished and the results are shown here. The HP Taper Match Program V4.84 has been updated. The stock rods are 23.5" long and bent at right-angle for a length of 5.5". The bend was reformed to apx 30 degs to make the required 11.25" HP spacing. Also each rod was bent apx 15 degs up to form a smooth transition to the mounting/shorting block located on the boom. Again all went well. The shorting block consists of a 2" saddle and an 4" alum bar modified to keep the HP lines fixed at 5.25" separation. The saddle and clamp can be moved (slid) along the boom to the required set point which is now at 13" as shown in the picture. |
||||||||||||||||||||||||||||
Balun Assembly The driven element mounting method consists of a aluminum bracket formed around the driven element and attached w/ stainless steel 3/4" screws. The bottom portion shows the balun attached to the feed point on the underside of the boom. The Balun Design Model 1115t features outstanding isolation impedance in a small size case. The impedance chart (here) shows the outstanding isolation @ 20mtrs of 5000 ohms that translates to -20dB of isolation! Normal precautions such as Coax-Seal s/b used to seal the coax input to prevent water from getting into the balun and weep holes s/b added to the cover to faciltate condensation removal. The previous baluns (WireMan and DX Eng) specs were ok from 4Mhz to 10Mhz with a Z around 1000 ohms. However on 20 mtrs, the isolation is apx 400 to 500 ohms, giving about -10dB isolation at best. |
||||||||||||||||||||||||||||
Check back here for more pics . . . . plan is to extend the tips and, the big job, add "Bird Spikes" prior to mounting on a temporary testing site. Hopefully, it will be the roof, apx 16' off the ground. |
 The graph shows the summarized data. For 20mtrs operation, the typical impedance [Z] of 1300 ohms can be had w/ 50 beads
of #73 material. Extrapolation shows that 25 beads could produce about 600 ohms isolation impedance yielding about
-10dB isolation.
