|
K6JRF's Page formerly W6FZC FT1000D 2nd Rcvr and SHP Cap Mods Page |
|
This report details changes to the FT1000D 2nd Receiver Board and SHP Headphone Board
resulting in much flatter response as measured from the front panel phone jack ('MONI') by replacing four (4) capacitors
on the 2nd Rcvr Board and two (2) caps on the SHP Board. |
|
2nd Rcvr Cap Mods Section The FT1000D uses the 2nd receiver unit during transmit as the signal monitor when the 'MONI' switch is pushed. The output is made available from the front panel phone jack. The stock radio uses a Murata CFJ455K15, 2.4Khz bw ceramic filter which matches the 2.4Khz transmit bandwidth of the radio. This section builds on Note 4a) and assumes that the new Murata filter (CFJ455K12) filter is installed. If not, please refer to that note before attempting to install these capacitor changes.Circuit Analysis: The schematic below shows the PSpice generated representation of the audio recovery section in the 2nd Rcvr. A short theory of operation follows.
The processed signal is then passed through a series of switches and series 'C-R' elements before it arrives at the final buffering stage (Q6017) and passed out of the Board as "RX2". As we have seen throughout the many pcbs in the radio, the typical 'YAESU' time constant are designed to 'starve' the low and high frequencies! Since the stock radio cuts off at 2.5Khz or so, why not?? But with our wider response, these must be changed to more suitable values. The biggest 'offenders' are the values for the LPF which are shown below before modification. These result in a restricted bandwidth of 84hz to 2500hz at the -3dB points.
The next chart shows the results of four (4) capacitors changes to that circuit. The increased bandwidth now covers the region encompassed by hifi Tx audio with a 'little' bit to spare!!
1) Remove top and bottom covers of the radio. With the radio on its side left side, located the 2nd receiver unit. Remove the shield cover from the unit. Next remove the seven (7) screws that hold the unit down. Remove the J6004 connector. Next cut the cable tie that hold the unit's cable assembly down. Next, gently lift up on the board and flip it over. 2) Remove and replace the following parts. Note that all parts are CHIP resistors and capacitors. There is not a lot of room to work but they do fit quite nicely. You should be very proficient with a soldering iron to do this change! C6085: replace with Radio Shack PN 272-125 (470p) ceramic cap. C6086: replace with Radio Shack PN 272-124 (220p) ceramic cap. C6090: replace with Radio Shack PN 272-1434 (1uf) tantalum cap. C6402: replace with Radio Shack PN 272-125 (470p) ceramic cap. 3) Replace the board but first slip a mini cable tie through the chassis tie point. Dress the cable assembly and replace the seven (7) screws. Put the shield cover back into place. The picture shows the top view of the 2nd Rcvr Board and location of C6090. I have removed a number of 1uf caps in making the many mods to my radio. I reused one of the removed caps instead of the RS tantalum cap.
|


|
2nd Rcvr and SHP Cap Mod Results The results of the changed caps are shown below. The RED chart shows the response of a 20hz to 5Khz sine sweep. The BLUE chart shows the same sweep after the four (4) caps have been changed. The AQUA line shows the results with the two (2) caps changed on the SHP Board. The overall results show about +5dB in BASS response and +6dB increase from 2.5Khz to 3Khz. This SHP mod itself added about +1dB increase over the 2nd Rcvr cap mods which is not very significant but every dB helps! The BLUE line is difficult to see but it's just under the AQUA line.The radio Tx response is considerably flatter and listening with headphones gives a new appreciation for the transmitted audio! You'll hear sounds that you thought were missing, especially when using headphones!
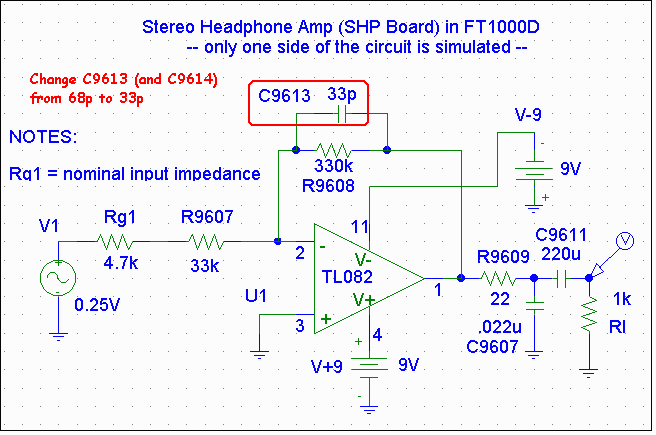
SHP Board Mod Results The final output from the MONItor function is further processed by the SHP Board in the FT1000D. The schematic below shows one of the two channels.
|


|
Send me |